2019 the TroPro trade exh…
How to adjust the laser beam path
How to install new laser tube
Release Time:2016/12/06 troubleshooting Browsing Times:1059
Some point of the same piece of materials cannot be cut through, why?
This problem is mainly caused by following three reasons:
1. The cutting material is bent (not flat) or uneven density.
2. The working table is not level
3. Laser beam is not vertical after being focused by lens.
1. If the material is not flat, please use magnets to fix the material.
2. The working table itself is not level.
Large height error causes different focal distances and this result in bad cutting result. Please check whether height of four corners is the same.

Please refer to the document of “How to calibrate the working table to level” if needed.
3. Laser beam is not vertical after being focused by lens.
Please check whether the laser beam is all vertical to the working table’s center and four corners. If yes, please continue to check step two.
If not all vertical, please adjust the laser beam path (directly adjust the third reflective mirror).
Please refer to below video to learn how to check the verticality of laser beam.
Please go to step 4 and step 5 of above video directly.
1) When the laser head move to four corners of the working table, check if the laser beam lasers to the same position of the third reflective mirror.
2) When the laser head moves to four corners of the working table, check if the laser beam can vertically go through the acrylic.
Make sure the laser path can meet above two requirements. If not, please adjust the verticality as following instructions (for 3rd reflective mirror)

3rd mirror mount
Adjust screw A: Loosen the nut and rotate clockwise, then the laser beam will moves left; if you rotate anticlockwise, the laser beam will moves right.
Adjust Screw B: Loosen the nut firstly. If rotate clockwise, the laser beam will moves upward; if rotate anticlockwise, the laser beam moves backward.
Adjust screw C: Loosen the nut. If rotate clockwise, the laser beam will moves forward and right; if rotate anticlockwise, the laser beam moves backward and left.
White screws D: Please loosen these three white screws before adjusting Screw A/B/C. After finish, tighten these three white screws (and lock all nuts of screws)
Step 1:

Adjust Screw A/B/C so as to change the angle of the third reflective mirror. If the laser beam comes out from the bottom center of the laser head, it proves that third mirror is in right 45°.
Make sure the laser beam comes out from bottom center of laser head, like below:

Step 2:
Pulse a laser beam on 10mm acrylic, check if the line is vertical or not

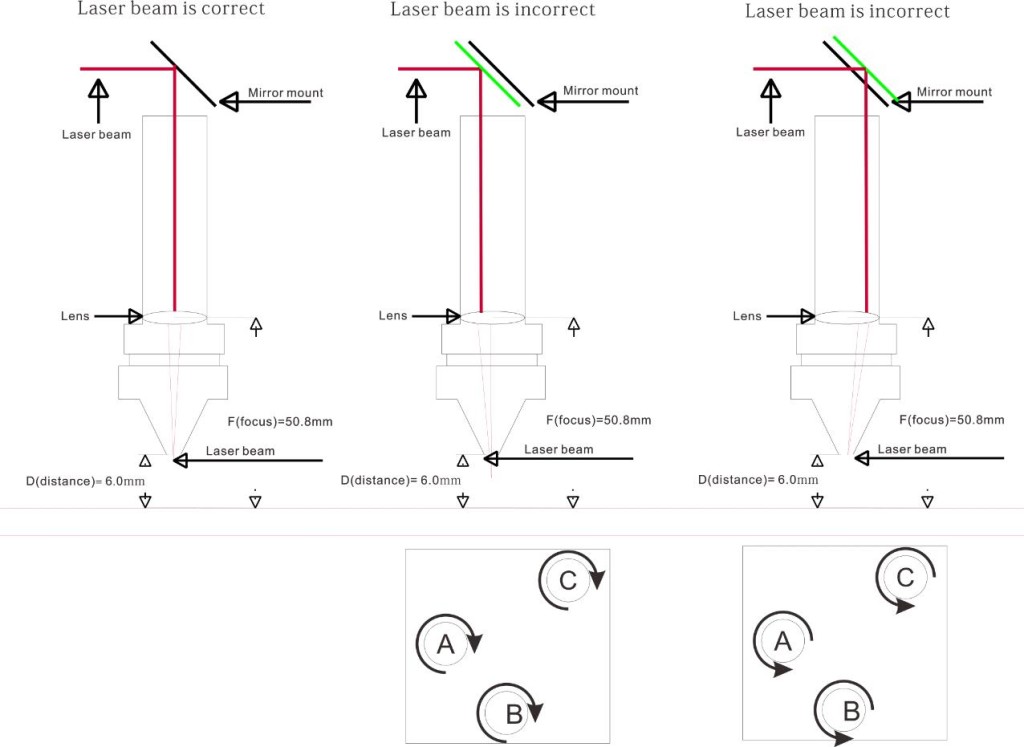
If the checking results show as photo 2 and photo 3
Please keep adjusting the laser beam path of 3rd mirror mount until the laser beam’s vertical is working fine as photo 1 as shown.
At last, tighten all the adjusting screws and white screws and move the laser head to four corners to test the laser beam verticality.
If the problem still exists, please contact with our tech team in time by email: tech@thunderlaser.com.

THUNDER LASER New Zealand will show case a range of CO2 laser cutting and engraving systems. We're devoted to offer the New Zealanders domestic, industrial and educational clients a quality and affordable laser system backed up with great service.
If you are interested in our laser systems or need any tech support, please feel free to contact us.
Mike Carrigan
Company address :
115 Isaac Road Eyrewell Forest Rangiora RD6, NZ 7476
Tel:
64272987777
Sales Email:
mike@itsnzltd.com